


Photo by Sincerely Media on Unsplash
Building a blog with SvelteKit, TailwindCSS, and MDsveX


Table of contents
Notes
This post can also be found on my main page at jvp.design/blog/building-a-blog-with-svelte..
For those who want to follow along in code, you can get it from github.com/jvp-design/sveltekit-tailwind-md..
A YouTube video accompanying this article has been uploaded. Check it out: youtu.be/-OSTAkjGVng
Intro
In the last blog post I described how to self-host a font in SvelteKit using Tailwind CSS. I then tried to do a live-stream in which I used the aforementioned functionality and extended it by installing MDsveX and setting it up. I left off the video with a very trimmed down blog sample and noted that I may add styling if people wanted it. In this post I will not only add in styling but will also include things like pagination and search.
Updates to the last blog post
There were a few things that I did in the video that need to be updated from the last blog post.
Different fonts
The first thing that is different from the blog post is the fonts that were used.
In the last blog post I used Walkway and Lobster Two and in the blog post I used Uncut Sans and Sprat.
As such, the app.css file should replace the @font-face elements and look like
@tailwind base;
@tailwind components;
@tailwind utilities;

@layer base {
    h1,
    h2,
    h3,
    h4,
    h5,
    h6 {
        @apply font-serif;
    }
    @font-face {
        font-family: 'sprat';
        src: local('Sprat'), local('sprat'), url('/fonts/sprat/Sprat-Regular.otf');
        font-weight: normal;
        font-display: swap;
    }
    @font-face {
        font-family: 'sprat';
        src: local('Sprat'), local('sprat'), url('/fonts/sprat/Sprat-RegularMedium.otf');
        font-weight: 500;
        font-display: swap;
    }
    @font-face {
        font-family: 'sprat';
        src: local('Sprat'), local('sprat'), url('/fonts/sprat/Sprat-RegularBold.otf');
        font-weight: 600;
        font-display: swap;
    }

    @font-face {
        font-family: 'uncut-sans';
        src: local('Uncut-Sans'), local('Uncut Sans'), local('uncut-sans'), local('uncut sans'),
            url('/fonts/uncut-sans/Uncut-Sans-Regular.otf');
        font-weight: normal;
        font-display: swap;
    }
    @font-face {
        font-family: 'uncut-sans';
        src: local('Uncut-Sans'), local('Uncut Sans'), local('uncut-sans'), local('uncut sans'),
            url('/fonts/uncut-sans/Uncut-Sans-Medium.otf');
        font-weight: 500;
        font-display: swap;
    }
    @font-face {
        font-family: 'uncut-sans';
        src: local('Uncut-Sans'), local('Uncut Sans'), local('uncut-sans'), local('uncut sans'),
            url('/fonts/uncut-sans/Uncut-Sans-Semibold.otf');
        font-weight: 600;
        font-display: swap;
    }
}
Here I'm using a few more fonts and I've also set it up where any header tags will automatically use the Sprat font by default.
Then the tailwind.config.js file should now look like this
const defaultTheme = require('tailwindcss/defaultTheme');

module.exports = {
    content: ['./src/**/*.{html,js,svelte,ts}'],
    theme: {
        extend: {
            fontFamily: {
                sans: ['uncut-sans', ...defaultTheme.fontFamily.sans],
                serif: ['sprat', ...defaultTheme.fontFamily.serif]
            }
        }
    },
    plugins: []
};
MDsveX
Installation
The next thing that needs to be done to approach where we were in the video is installing and setting up MDsveX. The first thing you need to do is install the package from npm
npm i -D mdsvex
Configuring
Then you'll need to create a file called mdsvex.config.js at the root of your project.
I'll display the file in its entirety here and explain it below
import { defineMDSveXConfig as defineConfig } from 'mdsvex';
import { fileURLToPath } from 'url';
import * as path from 'path';

const dirname = path.resolve(fileURLToPath(import.meta.url), '../');

const config = defineConfig({
    extensions: ['.md', '.svx'],
    smartypants: { dashes: 'oldschool' },
    layout: { blog: path.join(dirname, './src/routes/blog/_layout.svelte') }
});

export default config;
The dirname variable effectively converts the "current" location of the project in your own file-system.
This value is then used to point directly to the layout we'll be using for blog posts, called "blog", in the file system of the project.
So, we're telling MDsveX that any file we set up with the template named "blog" should use the _layout.svelte file that we'll be creating and saving in the ./src/routes/blog/ folder.
The extensions entry in the config just tells MDsveX to look convert files with either the .md or .svx extension.
Information about smartypants functionality can be found at mdsvex.pngwn.io/docs#smartypants.
Adding to SvelteKit Project
Now we need to tell our SvelteKit project to actually use this config that we've just set up.
In svelte.config.js you'll need to add two things:
extensions: ['.svelte', ...mdsvexConfig.extensions]mdsvex(mdsvexConfig)to thepreprocessattribute
Your svelte.config.js file should now look like
import { mdsvex } from 'mdsvex';
import adapter from '@sveltejs/adapter-auto';
import preprocess from 'svelte-preprocess';
import mdsvexConfig from './mdsvex.config.js';

/** @type {import('@sveltejs/kit').Config} */
const config = {
    extensions: ['.svelte', ...mdsvexConfig.extensions],
    preprocess: [
        preprocess({
            postcss: true
        }),
        mdsvex(mdsvexConfig)
    ],
    kit: {
        adapter: adapter()
    }
};

export default config;
Adding a Blog Layout
Finally, we need to add the aforementioned _layout.svelte file to the /src/routes/blog folder.
For now it will simply have a <slot /> element, but we'll add styling and functionality later.
Fetching Blog Posts
Sample Blog Posts
First, let's create a few very simple markdown files to act as blog posts:
/src/routes/blog/foo-bar.md
---
title: Foo Bar
author: Jeff
date: 2022-04-15
layout: blog
excerpt: Lorem ipsum dolor sit amet, consectetur adipiscing elit. Maecenas vestibulum odio nisl, nec pretium dolor varius in.
---

Lorem ipsum dolor sit amet, consectetur adipiscing elit. Maecenas vestibulum odio nisl, nec pretium dolor varius in. Quisque tincidunt egestas libero rhoncus blandit. Etiam elit leo, facilisis id magna sit amet, vestibulum finibus nulla. Vestibulum porttitor nisl id ligula accumsan, et dapibus justo cursus. Phasellus congue mauris vitae dictum auctor. Sed vitae mollis quam. Morbi venenatis metus ligula, sit amet consectetur eros pharetra vel.

Maecenas efficitur mauris eu ex viverra, ut consequat metus ultrices. Sed imperdiet leo odio, in aliquam orci sagittis ut. Vivamus eget sem et nibh faucibus luctus vel a enim. Sed orci tortor, semper ut vulputate at, hendrerit dapibus dolor. Pellentesque tincidunt tempor efficitur. Etiam efficitur pellentesque nisi, sit amet feugiat nisi. Maecenas nisl odio, viverra vitae rhoncus eu, placerat vitae ante. Quisque suscipit nibh lacus, sit amet facilisis tellus fermentum in. Integer nec lacinia risus, ut lobortis ex.

Integer nec ultricies nisi. Curabitur odio mauris, scelerisque at luctus a, bibendum eget velit. Vivamus id tellus lectus. Nulla in purus sit amet mi tincidunt commodo. Ut auctor ante a mauris dignissim laoreet. Nullam magna arcu, tincidunt nec risus et, mattis fringilla augue. Suspendisse imperdiet, purus vel pharetra bibendum, enim purus convallis quam, ut faucibus nibh libero in enim. Curabitur feugiat leo ac accumsan tempor. Ut non convallis mauris, sed rutrum libero.

Maecenas vehicula maximus justo, pellentesque consequat sem dignissim a. Proin quis lectus molestie, pellentesque massa in, egestas orci. Vestibulum facilisis enim at magna scelerisque, quis suscipit quam ultrices. Proin a rutrum tortor. Proin vel scelerisque nunc. Nullam condimentum sit amet magna eu rutrum. Quisque magna enim, aliquet ut blandit et, viverra eu leo. Sed molestie sem et quam consequat mattis. Donec elit velit, cursus at ipsum nec, ullamcorper tincidunt neque.

Nunc convallis odio justo, non interdum dolor ultricies interdum. Curabitur accumsan sem a iaculis placerat. Donec eu facilisis sem, vel bibendum risus. Aliquam non tincidunt est, a auctor magna. Ut erat libero, commodo non malesuada quis, porttitor sit amet libero. Curabitur pulvinar ornare leo id efficitur. Donec sollicitudin arcu venenatis odio elementum, at venenatis erat efficitur. In porta mi et sollicitudin faucibus. Vivamus vel metus interdum, facilisis nisl at, ullamcorper mauris. Sed ac nisl at dolor varius aliquam. In facilisis pretium interdum. Sed tempus purus at pulvinar scelerisque. Etiam eu purus eleifend, commodo turpis eget, aliquet turpis. Mauris fermentum magna dictum lorem bibendum tempor.
/src/routes/blog/foo-baz.md
---
title: Foo Baz
author: Jeff
date: 2022-07-15
layout: blog
excerpt: Lorem ipsum dolor sit amet, consectetur adipiscing elit. Maecenas vestibulum odio nisl, nec pretium dolor varius in.
---

Lorem ipsum dolor sit amet, consectetur adipiscing elit. Maecenas vestibulum odio nisl, nec pretium dolor varius in. Quisque tincidunt egestas libero rhoncus blandit. Etiam elit leo, facilisis id magna sit amet, vestibulum finibus nulla. Vestibulum porttitor nisl id ligula accumsan, et dapibus justo cursus. Phasellus congue mauris vitae dictum auctor. Sed vitae mollis quam. Morbi venenatis metus ligula, sit amet consectetur eros pharetra vel.

Maecenas efficitur mauris eu ex viverra, ut consequat metus ultrices. Sed imperdiet leo odio, in aliquam orci sagittis ut. Vivamus eget sem et nibh faucibus luctus vel a enim. Sed orci tortor, semper ut vulputate at, hendrerit dapibus dolor. Pellentesque tincidunt tempor efficitur. Etiam efficitur pellentesque nisi, sit amet feugiat nisi. Maecenas nisl odio, viverra vitae rhoncus eu, placerat vitae ante. Quisque suscipit nibh lacus, sit amet facilisis tellus fermentum in. Integer nec lacinia risus, ut lobortis ex.

Integer nec ultricies nisi. Curabitur odio mauris, scelerisque at luctus a, bibendum eget velit. Vivamus id tellus lectus. Nulla in purus sit amet mi tincidunt commodo. Ut auctor ante a mauris dignissim laoreet. Nullam magna arcu, tincidunt nec risus et, mattis fringilla augue. Suspendisse imperdiet, purus vel pharetra bibendum, enim purus convallis quam, ut faucibus nibh libero in enim. Curabitur feugiat leo ac accumsan tempor. Ut non convallis mauris, sed rutrum libero.

Maecenas vehicula maximus justo, pellentesque consequat sem dignissim a. Proin quis lectus molestie, pellentesque massa in, egestas orci. Vestibulum facilisis enim at magna scelerisque, quis suscipit quam ultrices. Proin a rutrum tortor. Proin vel scelerisque nunc. Nullam condimentum sit amet magna eu rutrum. Quisque magna enim, aliquet ut blandit et, viverra eu leo. Sed molestie sem et quam consequat mattis. Donec elit velit, cursus at ipsum nec, ullamcorper tincidunt neque.

Nunc convallis odio justo, non interdum dolor ultricies interdum. Curabitur accumsan sem a iaculis placerat. Donec eu facilisis sem, vel bibendum risus. Aliquam non tincidunt est, a auctor magna. Ut erat libero, commodo non malesuada quis, porttitor sit amet libero. Curabitur pulvinar ornare leo id efficitur. Donec sollicitudin arcu venenatis odio elementum, at venenatis erat efficitur. In porta mi et sollicitudin faucibus. Vivamus vel metus interdum, facilisis nisl at, ullamcorper mauris. Sed ac nisl at dolor varius aliquam. In facilisis pretium interdum. Sed tempus purus at pulvinar scelerisque. Etiam eu purus eleifend, commodo turpis eget, aliquet turpis. Mauris fermentum magna dictum lorem bibendum tempor.
/src/routes/blog/hello-world.md
---
title: Hello World
author: Jeff
date: 2022-05-27
layout: blog
excerpt: Lorem ipsum dolor sit amet, consectetur adipiscing elit. Morbi eget massa sit amet arcu varius lacinia nec quis lacus.
---

Lorem ipsum dolor sit amet, consectetur adipiscing elit. Morbi eget massa sit amet arcu varius lacinia nec quis lacus. Proin auctor lectus a volutpat porta. Nullam eget ipsum convallis, elementum orci sodales, blandit velit. In imperdiet, ligula sed ultricies pharetra, metus mi consequat dui, vitae luctus dolor ligula eu nunc. Fusce consequat mauris ac egestas iaculis. Quisque pharetra et ante maximus convallis. Nulla sollicitudin velit molestie mauris dignissim, at hendrerit diam fringilla. Donec mollis eget ex non iaculis. In a vehicula nisl. Donec dapibus orci in enim posuere, non rhoncus risus ultrices. Pellentesque elementum metus ipsum, ut scelerisque mauris ultrices vel.

Aliquam ullamcorper est vehicula, suscipit nulla pellentesque, convallis odio. Praesent eget elit eget magna fringilla pharetra tempor quis magna. Proin et est vestibulum neque rhoncus mattis non vel lacus. Proin vulputate risus vel dignissim vestibulum. Quisque id sollicitudin neque, sed sagittis urna. Vestibulum vehicula metus sed eros venenatis, sit amet facilisis nunc porta. Nam pharetra luctus sapien, ut venenatis nibh tincidunt mollis. Phasellus efficitur, felis vitae mattis cursus, sapien diam vulputate dui, sit amet pulvinar ante ipsum non urna.

Fusce est nulla, efficitur vitae turpis eget, pretium rutrum turpis. Fusce at lectus eros. Phasellus convallis condimentum dolor ac rutrum. Integer commodo augue et dui efficitur tincidunt. Nam scelerisque egestas quam, vitae ultrices turpis tincidunt rhoncus. Duis rutrum placerat erat. Ut ac tincidunt elit. In laoreet dictum mauris nec posuere. Curabitur tempus, dolor malesuada ultrices feugiat, ipsum eros faucibus tellus, eu ultricies nunc est sed dolor. Suspendisse nisi eros, vehicula vitae iaculis sit amet, aliquet sit amet leo. Sed euismod urna at eros posuere laoreet. Curabitur in sodales lorem. Nulla rutrum aliquam felis ac tempor.

Ut pretium vitae elit ac facilisis. Aliquam nisi tortor, feugiat at lacus sed, condimentum egestas urna. Vestibulum hendrerit augue non urna volutpat, et fermentum tortor pellentesque. Aenean eget pharetra leo. Vestibulum ut laoreet dui. Phasellus nec nunc imperdiet, mollis urna eget, interdum lacus. Nulla ac neque pulvinar ex vestibulum venenatis at sed mi. Aliquam faucibus risus eget dolor porttitor interdum. Phasellus rutrum augue ex, vel tempus velit sollicitudin vitae. Pellentesque libero sapien, ullamcorper nec elementum nec, pharetra sed nisl. Nullam egestas arcu et ex vulputate, pretium vestibulum odio convallis. Nam auctor risus nec fermentum ultricies.

Donec porttitor quis ipsum ut imperdiet. Fusce ac pretium felis, sit amet pharetra orci. Donec vitae quam ac tellus pellentesque fringilla. Curabitur placerat quam a leo imperdiet tincidunt. Nunc porta pulvinar orci sit amet varius. Suspendisse dapibus ipsum nec magna ultricies gravida. Maecenas varius justo ac sem rhoncus lobortis. Integer eget cursus diam. Vestibulum sollicitudin enim at metus scelerisque blandit. In sit amet pulvinar nunc. Sed sit amet rutrum ex, efficitur imperdiet nunc.
Fetch the Blog Posts for Svelte
The way the latest version of SvelteKit works is that you no longer need to use <script context="module"> and export an async load function, etc.
We can very simply grab all the posts and return them as a body element from a JavaScript file, and then use the same key as a prop in the Svelte component.
Before we can parse the files I want to introduce a simple function to convert a raw UTC date to a more human-friendly date time.
This is fairly straightforward and I just include it here for reference.
// /src/lib/utils.js

export const convertDate = (published) => {
    const months = {
        1: 'Jan',
        2: 'Feb',
        3: 'Mar',
        4: 'Apr',
        5: 'May',
        6: 'Jun',
        7: 'Jul',
        8: 'Aug',
        9: 'Sep',
        10: 'Oct',
        11: 'Nov',
        12: 'Dec'
    };
    const date = published.substring(0, 10);
    const [year, month, day] = date.split('-');
    return `${day}-${months[parseInt(month)]}-${year}`;
};
We then use this function in the next file.
// /src/routes/blog/index.js
import { convertDate } from '$lib/utils';

export async function get() {
    const allPostFiles = import.meta.globEager('./*.{svx,md}');
    const allPosts = Object.entries(allPostFiles).map(([path, post]) => {
        const postPath = path.slice(2, -3);
        return { ...post.metadata, path: postPath, published: convertDate(post.metadata.date) };
    });
    const posts = allPosts.sort((a, b) => new Date(b.date) - new Date(a.date));
    if (!posts.length) {
        return { status: 404 };
    }
    return { body: { posts } };
}
The first line fetches all files that are in /src/routes/blog that end with either an .svx or .md extension.
The resulting allPostFiles is somewhat nonsensical for our purposes and looks like
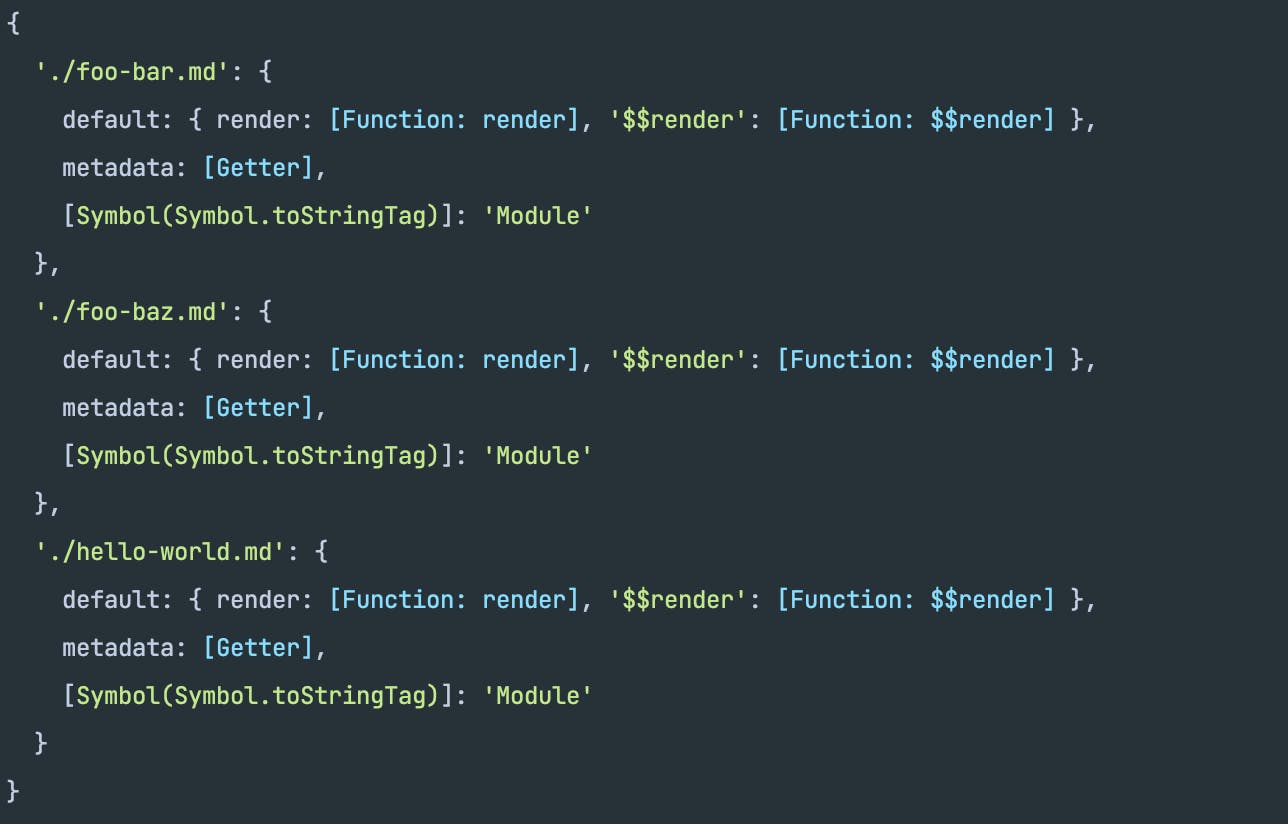
What we can do, though, is cycle through each entry, and fetch the post path (the slice takes off the beginning ./ characters and ending .md characters) and grabs any metadata created by MDsveX.
The metadata created by MDsveX is all the content in between the --- characters, also called "front matter" in the markdown file.
We then simply sort the files descending by date (i.e. most recent first) and if there are no posts then we simply return a 404 error, otherwise we return the posts as the body of the response, with the key of posts.
Create "List View"
We now need to create a file where we can view all the available blog posts.
This file name needs to match the base (without the extension) of the JavaScript file we just created.
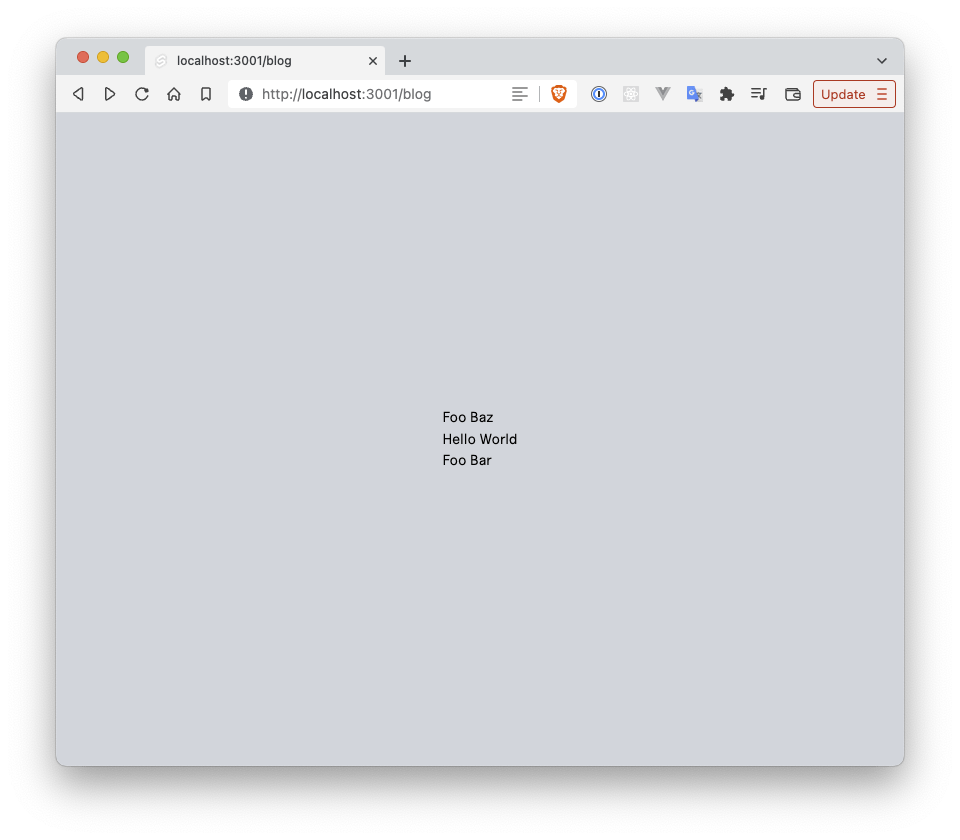
Thus, we will create a /src/routes/blog/index.svelte file and add render the posts.
<script>
    export let posts;
</script>

<ul>
    {#each posts as post}
        <li>
            <a href="/blog/{post.path}" sveltekit:prefetch>{post.title}</a>
        </li>
    {/each}
</ul>
and if we navigate to http://localhost:3000/blog/ we should then see
New "Stuff"
Now that we've essentially gotten up-to-date relative to the last video, let's start styling things.
Blog List View
The first thing to do is remove the grid layout from the main /src/routes/__layout.svelte file because I want to be able to set the layout in the individual page.
Now __layout.svelte looks like
<script>
    import '../styles/app.css';
</script>

<div class="h-screen">
    <slot />
</div>
Now we can update /src/routes/blog/index.svelte with a bit more pleasing styling
<script>
    export let posts;
</script>

<div class="bg-white pt-16 pb-20 px-4 sm:px-6 lg:pt-24 lg:pb-28 lg:px-8">
    <div class="max-w-lg mx-auto lg:max-w-7xl">
        <div class="border-b border-b-gray-200 pb-6">
            <h2 class="text-3xl tracking-tight font-semibold text-gray-900 sm:text-4xl">Recent Posts</h2>
        </div>
        <div class="mt-12 grid gap-16 lg:grid-cols-3 lg:gap-x-5 lg:gap-y-12">
            {#each posts as post}
                <div class="border border-gray-200 p-4 rounded-lg flex flex-col justify-between">
                    <a href="/blog/{post.path}" sveltekit:prefetch>
                        <p class="text-xl text-gray-900">{post.title}</p>
                        <p class="mt-3 text-gray-500">{post.excerpt}</p>
                    </a>
                    <div class="mt-6">
                        <p class="text-sm font-medium text-gray-900">
                            {post.author}
                        </p>
                        <div class="text-sm text-gray-500">
                            <time datetime="2020-03-16">{post.published}</time>
                        </div>
                    </div>
                </div>
            {/each}
        </div>
    </div>
</div>
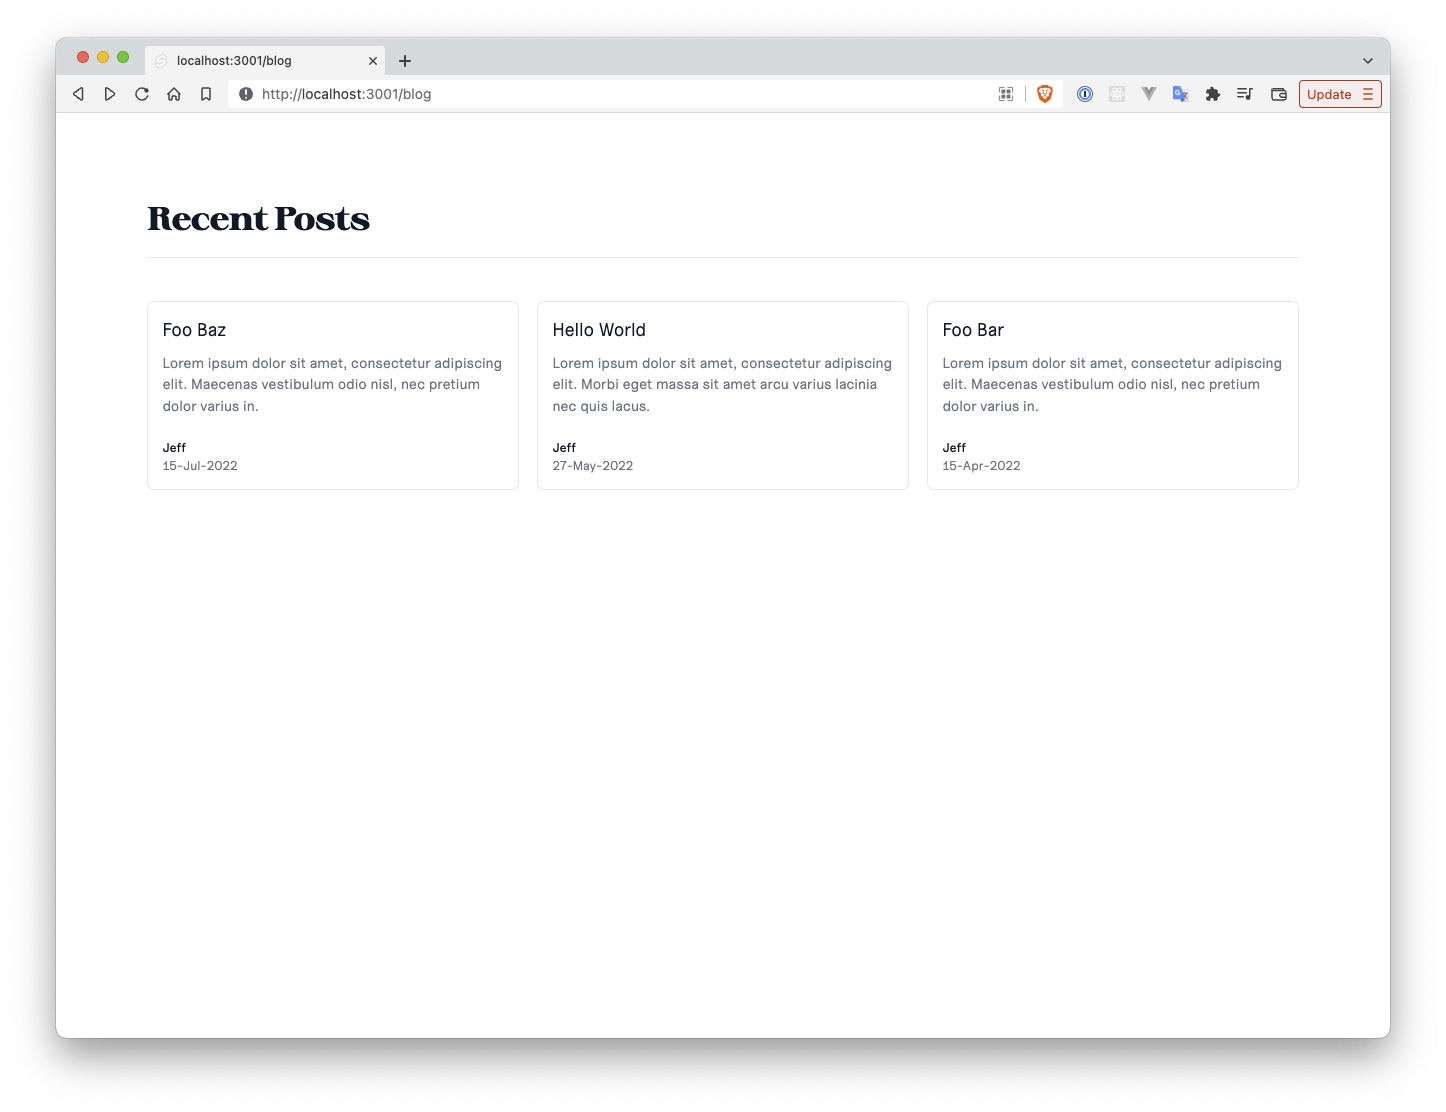
There is a lot to work through in all of the classes above and I encourage you to go to the Tailwind website to explore what each thing is doing, but you can see what the resulting image looks like here
Blog "Detail View"
We now want to update the styling for each blog post. The first thing we need to do is install another dependency because we'll be using some built-in Tailwind functionality. We can install the typography package by typing
npm i -D @tailwindcss/typography
and we then add this as a plugin in tailwind.config.js
// tailwind.config.js

const defaultTheme = require('tailwindcss/defaultTheme');

module.exports = {
    content: ['./src/**/*.{html,js,svelte,ts}'],
    theme: {
        extend: {
            fontFamily: {
                sans: ['uncut-sans', ...defaultTheme.fontFamily.sans],
                serif: ['sprat', ...defaultTheme.fontFamily.serif]
            }
        }
    },
    plugins: [require('@tailwindcss/typography')]
};
Update /src/routes/blog/_layout.svelte
Now that we actually have some blog posts we'll need to update our blog _layout.svelte file to be able to consume them.
The first thing we're going to need to do is expose the props that we'll want to use in the post content, namely
titleauthordate
and we'll also need to import convertDate to make a "pretty" date on the post.
The script section of /src/routes/blog/_layout.svelte will then look like
<script>
    import {convertDate} from '$lib/utils.js'; export let title; export let author; export let date;
</script>
Then we'll set certain display characteristics on the main content, such as centering, setting max widths, etc
<div class="relative mx-auto max-w-prose overflow-hidden bg-white py-16 px-4 sm:px-6 lg:px-8"></div>
We then add a back button to go to the previous page, and for this we'll also directly use the svg code from Heroicons for arrow-left.
<span
    class="block cursor-pointer"
    on:click={() => {
        history.back();
    }}
>
    <svg
        xmlns="http://www.w3.org/2000/svg"
        class="inline h-6 w-6"
        fill="none"
        viewBox="0 0 24 24"
        stroke="currentColor"
        stroke-width="2"
    >
        <path stroke-linecap="round" stroke-linejoin="round" d="M11 17l-5-5m0 0l5-5m-5 5h12" />
    </svg>
    Back
</span>
Finally we'll add a bit of simple styling for the title, author/date combination, and the main content
<h2 class="my-4 text-4xl font-semibold">{title}</h2>
<p class="my-4 text-gray-500">by {author}, {convertDate(date)}</p>
<div class="prose prose-lg first-letter:text-3xl first-letter:text-blue-600">
    <slot />
</div>
Thus, now the whole _layout.svelte component looks like
<script>
    import { convertDate } from '$lib/utils.js';

    export let title;
    export let author;
    export let date;
</script>

<div class="relative mx-auto max-w-prose overflow-hidden bg-white py-16 px-4 sm:px-6 lg:px-8">
    <span
        class="block cursor-pointer"
        on:click={() => {
            history.back();
        }}
    >
        <svg
            xmlns="http://www.w3.org/2000/svg"
            class="inline h-6 w-6"
            fill="none"
            viewBox="0 0 24 24"
            stroke="currentColor"
            stroke-width="2"
        >
            <path stroke-linecap="round" stroke-linejoin="round" d="M11 17l-5-5m0 0l5-5m-5 5h12" />
        </svg>
        Back
    </span>
    <h2 class="my-4 text-4xl font-semibold">{title}</h2>
    <p class="my-4 text-gray-500">by {author}, {convertDate(date)}</p>
    <div class="prose prose-lg first-letter:text-3xl first-letter:text-blue-600">
        <slot />
    </div>
</div>
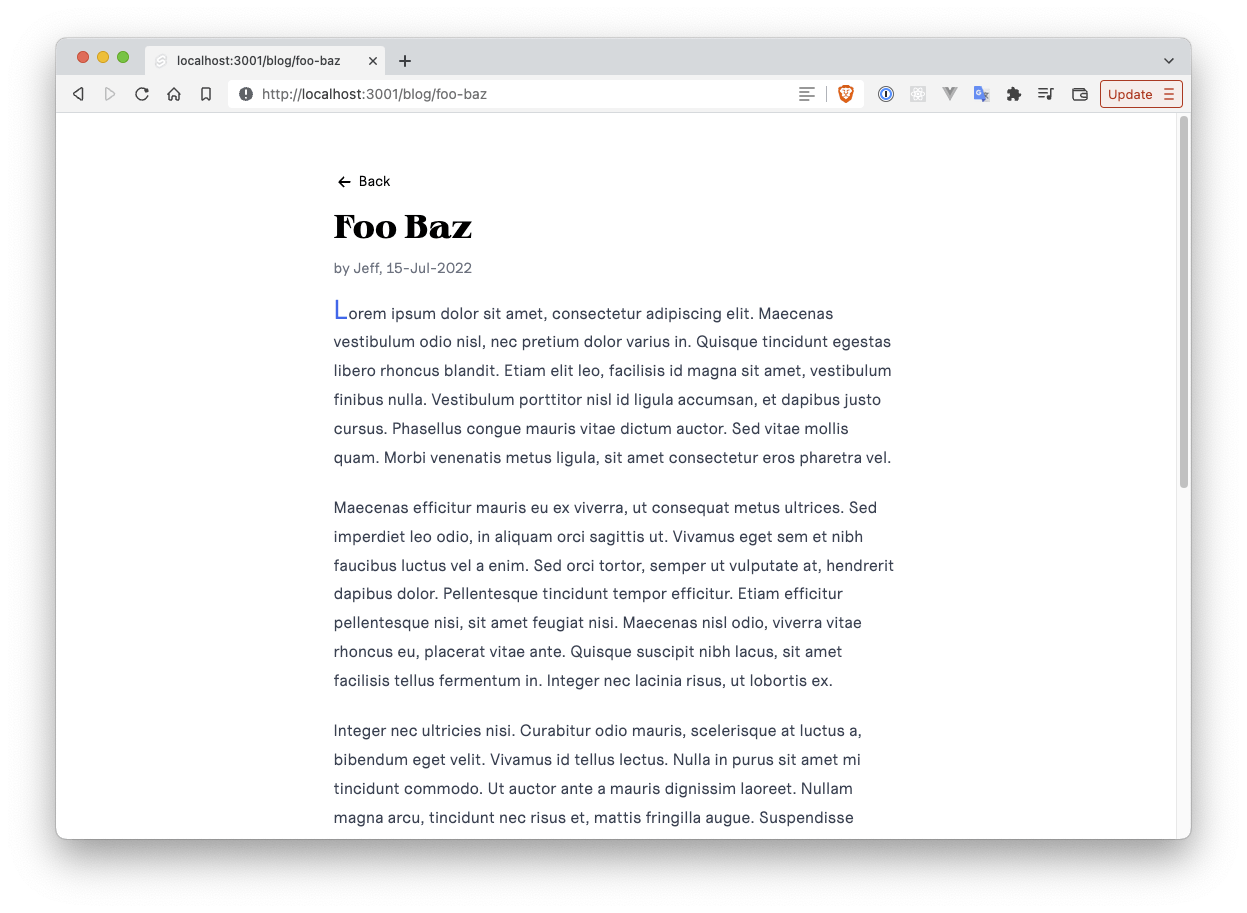
and if we visit http://localhost:3000/blog/foo-baz then we're greeted by the following image
Extra Functionality
There are two main things that can be helpful in what we're doing
- Search
- Custom Svelte components in markdown
Search
To demonstrate this functionality we will do a search by author.
So, go ahead and change the author of any of the already existing blog posts (I'll be doing this on foo-baz.md) to any other name (I'm using "Alice").
Next we need to go into /src/routes/blog/index.js and look for this search functionality.
The first step is to add an argument called {url} to the main get function.
Now the function signature looks like export async function get({ url }) {
We can next add in a filter to check the author, if one is passed in from the url argument.
import { convertDate } from '$lib/utils.js';

export async function get({ url }) {
    const allPostFiles = import.meta.globEager('./*.{svx,md}');
    const allPosts = Object.entries(allPostFiles).map(([path, post]) => {
        const postPath = path.slice(2, -3);
        return { ...post.metadata, path: postPath, published: convertDate(post.metadata.date) };
    });
    // New Code Starts Here
    const authorPosts = allPosts.filter((post) => {
        const author = url.searchParams.get('author');
        if (!author) return true;
        return post.author === author;
    });
    const posts = authorPosts.sort((a, b) => new Date(b.date) - new Date(a.date));
    // New Code Ends Here
    if (!posts.length) {
        return { status: 404 };
    }
    return { body: { posts } };
}
In the last line of the "New Code" block, I've simply replaced the array on which I'm sorting from allPosts to authorPosts.
The way this works is that if there is no author parameter included in the search then just return all posts, otherwise only return posts where the author matches the author term queried for.
Next we need to add functionality where a user can search by author from the main blog list view.
This is done very simply in that we just need to replace the p tag that displays the author name in /src/routes/blog/index.svelte with an a tag and set the href attribute to be ?author={post.author}.
The updated component looks like
<script>
    export let posts;
</script>

<div class="bg-white pt-16 pb-20 px-4 sm:px-6 lg:pt-24 lg:pb-28 lg:px-8">
    <div class="max-w-lg mx-auto lg:max-w-7xl">
        <div class="border-b border-b-gray-200 pb-6">
            <h2 class="text-3xl tracking-tight font-semibold text-gray-900 sm:text-4xl">Recent Posts</h2>
        </div>
        <div class="mt-12 grid gap-16 lg:grid-cols-3 lg:gap-x-5 lg:gap-y-12">
            {#each posts as post}
                <div class="border border-gray-200 p-4 rounded-lg">
                    <a href="/blog/{post.path}" sveltekit:prefetch>
                        <p class="text-xl text-gray-900">{post.title}</p>
                        <p class="mt-3 text-gray-500">{post.excerpt}</p>
                    </a>
                    <div class="mt-6">
                        <a href="?author={post.author}" class="text-sm font-medium text-gray-900">
                            {post.author}
                        </a>
                        <div class="text-sm text-gray-500">
                            <time datetime="2020-03-16">{post.published}</time>
                        </div>
                    </div>
                </div>
            {/each}
        </div>
    </div>
</div>
This functionality can be extended to any number of search parameters as well as things like pagination, but that will be handled another time.
Custom Svelte Components
One problem that I had when I tried using "simple" CMSes was that any time I wanted to include a URL it would open in the current page. This defeats one of the goals of a blog as it pertains to SEO: the amount of time spent on your site. Thus, ultimately, it would be beneficial to be able to have a way to tell SvelteKit to open URLs in a new page. We can do this by creating a custom Svelte component that we can use in our markdown files.
NewWindowUrl Component
This will be a fairly simple component in that all we need it to render is a pre-defined url with a description and have the target="_blank" attribute on it.
<script>
    // /src/lib/blog-components/NewWindowUrl.svelte

    export let url;
    export let description;

    if (!description) {
        description = url
    }
</script>

<a href={url} target="_blank">{description}</a>
Now we can use this in one of our blog posts (markdown files). Let's add a link to the root route of my site, but have it open in a new page. We'll create a new blog post: /src/routes/blog/test-custom-url.md
---
title: Testing a Custom URL Component
author: Bob
date: 2022-06-03
layout: blog
excerpt: Blah Blah testing a simple custom URL component
---

<script>
import NewWindowUrl from '$lib/blog-components/NewWindowUrl.svelte'
</script>

Hi there! Go ahead and give my <NewWindowUrl url="https://www.jvp.design" description="main site" /> a visit!
Then if we visit http://localhost:3000/blog/test-custom-url and click on the link it should open my main site on a new page.
We can use this for any number of things.
For example, for the blog posts for this site I have a custom component to handle different image formats (.webp and .png) which use the picture tag with a source tag for each item in an image's srcset group.
Maybe that can be another (shorter) blog post.